Eggs are normally associated with baking and cooking... but they can be used for crafting too! When your springtime layers kick into high production mode, you may start considering some fun crafts and decorating ideas to do with the surplus of eggs you have on hand. Egg art crafts can range from using the whole egg to just repurposing the eggshells. You don’t need to be crafty to do many of these projects, and they can be a fun way to get the whole family involved with the fresh eggs from your backyard flock!

How to Blow Out Eggs
If you want to display some of the fresh eggs from your flock or use them in a craft without worrying about them spoiling, learning how to blow out eggs is essential. Blowing out eggs involves poking small holes at either end of the egg and blowing in one hole to push the contents inside the egg out the other hole. Here’s a simple guide to blowing out eggs:
- Wash or rinse off the eggs you want to blow out. Choose eggs with strong shells and avoid eggs with abnormal shells. Candling the eggs can reveal thin shells, hairline cracks, and mottling.
- Poke a small hole in each pointed end of the eggshell. Make the bottom hole slightly larger since this is the hole all the egg contents will need to come out. A pin or toothpick works well for making the appropriate size holes at each end.
- Hold the egg over a bowl and blow in the small hole to push the contents out the bottom, larger hole. Alternatively, you can cut a short piece of plastic straw to blow through instead of blowing on the eggshell.
- Once all the contents have been blown out, rinse and dry the blown eggshells. You can let the rinsed eggshells dry overnight in a warm location.
The contents you blow out of each egg can be saved and used for cooking or in baking projects so they don’t go to waste. When poking a hole in the blunt end of the egg, make sure you poke all the way through the shell membranes and through the air cell as well. This will help the air you blow into the egg push the contents out the other end. It will take a decent amount of effort to push the contents through the hole in the eggshell. Sometimes it helps to vigorously shake the egg before poking holes in the eggshell. Shaking the egg can help break the chalazae and even the egg yolk, which will be the biggest contents that have to be blown through the hole in the shell.
Blown eggs can then be dyed, displayed, or used in various craft projects! You can choose to blow eggs to have a keepsake from a favorite hen, to save particularly pretty eggshells, or even to display eggs from different species of poultry you raise. You can blow chicken eggs, guinea eggs, duck eggs, goose eggs, quail eggs, and any other eggs you want!
How to Prep Eggshells for Crafts
Sometimes all you need for an egg art project are eggshells. You don’t need the whole egg and you don’t need a blown egg.... just eggshells. This is a great way to use up eggshells from baking or cooking projects! Save those leftover shells to dry and use in art projects! Here’s how to save and prep eggshells:
- Wash the eggshells out with dish soap and warm water. If possible, break a small part off of each eggshell and peel down into the shell and out to remove the eggshell membranes. This will help the eggs dry faster.
- Use vinegar and a cotton swab to rub any debris off the eggshells.
- Dry the eggshells by laying them on a drying rack cupped-side down in a dry, warm location. Alternatively, you can bake the eggshells in your oven until they are dry.
Once the eggshells are dry, you can dye them or crush them up to use in craft projects! To get pure white eggshells for dying or craft projects, you can soak the eggshells overnight in a ratio of 1 cup of water to 1 tsp. of bleach solution. You will need to rinse and dry the eggshells after soaking them before you can dye them or use them in a craft.

How to Dye Eggs
You can raise different chicken breeds that will lay you different colored eggs. However, it can also be a fun craft to try dying eggs you get from your backyard flock! Dying eggs from your backyard flock works best when you have hens that lay white or cream-colored eggshells.
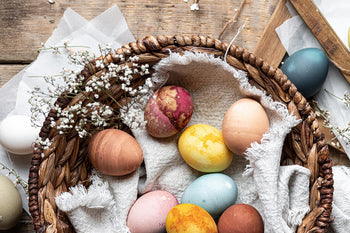
You can dye eggs using food coloring or opt for natural egg dying materials, such as onion skins, beet juice, or cabbage juice. You can dye hardboiled eggs, blown eggs, or just eggshells. When dying eggs, make sure the water you use is warmer than the egg so that the water doesn’t get absorbed through the eggshell. You want the dye to stain the shell, not simply pass through it. If you are using refrigerated eggs, the water can be at room temperature.
The length of time you let the egg set in the dying solution will impact how vibrantly dyed the egg becomes. The longer the egg sets in the dye, the more saturated the color will be. This is especially important when using naturally-derived dyes, which often take longer to dye an eggshell than food coloring dyes. You can experiment with making different designs on your dyed eggs by covering up parts of the shell prior to dying the egg. Drawing patterns with wax crayons, using stickers, or wrapping rubber bands around the eggshells can all create unique patterns!
Use a wire rack or egg holder when drying dyed eggs to prevent messing up the dye as it dries on the eggshell. Using a slotted spoon to remove the eggs from the dying solutions is helpful for draining off excess water before putting the eggs on the drying rack. A metal whisk can also be used to cage the egg and dip it into the dyes, making for easy containment and removal of the dyed egg. Wait until the eggs are completely dried before storing them or using the eggshells in craft projects!
Food Coloring Dye Starter Recipe
One ‘recipe’ for dying eggs using food coloring is combining ½ c. of water with 1 T. of vinegar and adding up to 20 drops of food coloring to achieve the desired color you want.
Natural Coloring Starter Recipe
Naturally-derived dyes can be obtained from vegetables, spices, herbs, and even beverages! Boiling eggs in a natural dye solution will create a more vibrantly dyed egg. However, you can also do the traditional soaking method with natural dyes as well. A 30-minute soak is generally needed to allow the natural dyes to color the eggshells. You can try doing layers of natural dyes to achieve different colors, such as soaking eggs in a beet dye then soaking them in a cabbage dye to achieve a lavender color.
Here are some foods you can derive natural dye colors from:
- 4 cups of chopped red cabbage- light blue, royal blue
- 3 T. turmeric root powder- deep gold, pale yellow
- 4 cups of onion skins- sienna, orange
- 4 cups of chopped beets- light pink
To make a natural dye solution from these foods, you will need simmer the ingredients in 4 cups of water with 2 T. of vinegar added. This will result in colored water that you can use for dipping the eggs into to dye them.
Naturally dyed eggs will fade in color faster than food coloring dyed eggs. The natural colors will stay fine if you enjoy the eggs over a few days or plan on eating boiled, dyed eggs. However, if you are using dyed blown eggshells or crushed eggshells for long-term craft projects or display purposes, you may want to coat the eggshells in a matte or gloss acrylic spray varnish to preserve the colors.
Egg Art Craft Ideas
Now that you have ways of cleaning and preserving eggshells for crafting, you can dive into the numerous projects that you can do with eggshells! Here are some fun project ideas to engage your creativity:

Eggshell Mosaics
This project involves gluing or sticking crushed eggshells onto flat surfaces to create a mosaic. The eggshells can be dyed beforehand, or you can use alcohol inks to dye the eggshells after they have been applied to a surface. Arrange crushed eggshells on wood plaques or other objects to create eggshell mosaics! Use a tacky clear gel glue as a sealer to preserve your eggshell mosaic crafts.

Eggshell Gardens
Eggshell halves make great plant starter cups or mini planters for small succulents and microgreens. All you need are cleaned and dried eggshell halves, some potting soil, an egg carton for holding the eggshells, some seeds, and some water. When choosing eggshell halves, it is helpful to pick eggshells that just have the top third cracked off so you have a deeper shell to hold more potting soil.
You can purposefully crack eggs so just the top third cracks off by gently tapping all around the narrow end of the egg about a third way down from the top with a sharp object to create small cracks. This should allow you to remove the top third of the shell, leaving you with a deep shell cup for planting seeds in.
Before planting in the eggshells, you can choose to decorate or dye the shells for pretty eggshell planters! Once you are ready to plant, start by using a pin or toothpick to poke a small drainage hole in the bottom of each eggshell. Arrange the eggshells in an egg carton so that they stay steady and secure.
Fill each eggshell with potting soil and moisten the soil with a couple sprays of water. Plant your seeds or small plants in the eggshells. Keep the eggshell planters in a sunny, warm location and make sure the soil stays moist so your plants grow and thrive! If you are using the eggshells as starter cups, there is no need to remove the seedlings when they are ready to be planted in the garden. Just gently crush the eggshells before planting the seedling so that the seedling roots have an easier time escaping from the shell.
Eggshell Décor
Get creative with eggshells and make some eggshell décor! Eggshell crafts are also a great project for kids to work on that they will find fun and engaging. All you need are some crushed eggshells, glue, and a surface to apply the eggshells to! Start by dying the eggshells various shades of colors. Then crush the eggshells so you have a variety of different size pieces. Now you can glue the eggshell pieces onto paper, terracotta planters, picture frames, or various wooden shapes! Kids may find it fun to draw a design, such as an Easter basket or flowers, on some paper and then fill-in the drawings by gluing eggshells onto the drawn designs.
Eggshell Candles
Not only can eggshells halves be made into mini planters, but they can also become candles! You will need rinsed and dried eggshells and an egg carton to keep the eggshell halves secure. To make simple candles, you will need some beeswax flakes, candle wicks, a hot glue gun, and some toothpicks. Use the hot glue gun to secure the candle wicks to the bottoms of each eggshell. Melt the beeswax, pour it into each eggshell, and allow the beeswax to harden. Use the toothpicks to keep the candle wicks straight as the wax hardens. If the wax hardens and shrinks, just add more melted wax until the eggshells are full.
Mosaic Eggs
Eggshell mosaics are fun to make, but you can also make mosaic eggs! Mosaic eggs can be a fun way to decorate dyed hardboiled eggs. You will need both hardboiled dyed eggs and dyed, crushed eggshells of various colors. Glue the broken eggshell pieces onto the shells of the dyed hardboiled eggs. A toothpick can be helpful for maneuvering eggshell pieces into position when applying them to the eggshell. Use rounded eggshell pieces to fit the curved top and bottom shell of the hardboiled eggs.
Blown Egg Art Ideas
So you’ve blown out some cool eggs, now what? You can display your blown eggs or create them into art! Use paint pens or fine tip sharpies to stencil or draw designs on the eggshell. This is often easier to do before the egg gets blown out since the shell will be more fragile once it dries. You can also decoupage the blown eggs or create egg mosaics like the method mentioned above. Create mini dioramas in eggs by cracking open one side of a blown egg and gluing in various objects to create a mini eggshell diorama.

Conclusion
Eggs are great for eating and baking, but they can also be fun for crafting or home décor projects too! Practice using different ways to dye hardboiled eggs and blown eggshells. Then use the dyed and crushed eggshells for other projects such as eggshell mosaics, mini planters, candles, or eggshell wall art! Get creative and enjoy using eggshells as a sustainable, eco-friendly crafting medium that can be enjoyed by the whole family!