This post comes from our friend Bri. Follow her on Instagram @chickenchaserbr to follow her chicken keeping journey.
Let’s be real, if you’ve got chickens (or are thinking about getting some), nesting boxes are one of the most essential things they’ll need. These little laying spots are like a cozy bedroom for your hens. Plus, raising chickens and DIY chicken projects are easier than you might think. I started with zero knowledge, and now I’m here to share everything I’ve learned with you. Let’s build nesting boxes together!

Why Nesting Boxes Matter
Chickens need a cozy, clean, and safe space to lay their eggs. Nesting boxes not only keep your hens happy but also make raising chickens so much easier. When your coop is set up efficiently, including easy-to-use nesting boxes, your egg collecting goes a whole lot smoother. A good nesting box setup means your eggs stay cleaner, and your mornings go quicker.
Choosing the Right Materials
Before you get started, here’s what you’ll need:
- Wood: Plywood or repurposed wood is perfect (and budget-friendly)
- Screws or nails: To hold everything together.
- Measuring tape and saw: Because your chickens want a perfect box.
- Non-toxic paint or sealant: Protect the wood and make cleaning a breeze.
- Soft bedding: Think hemp, wood shavings, or straw.
Pro tip: Using recycled materials isn’t just good for the planet—it adds personality to your coop. Plus, it’s a great way to save money.

Dimensions and Design Tips
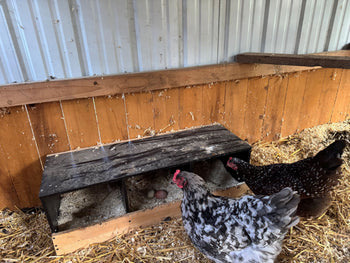
A standard nest box is 12x12x12 inches. I highly recommend going with these exact dimensions. It’s tempting to say bigger could be better, but the idea of a nest box is that it not only provides a soft place to lay an egg but also privacy. They like the box to be just big enough to move around. If you go much bigger, the chicken doesn’t feel as safe and secure. Going smaller than 12x12x12 doesn’t leave a lot of space for some of the thicker breeds like Orpingtons, Wyandottes, and others to move around, causing them to make their own nest somewhere else.
Must-haves:
- Easy access: Make it simple for your hens to hop in and for you to grab those eggs.
- Privacy: Hens love a chill, semi-dark spot to do their thing.
- Ventilation: Airflow is key to keeping things fresh and dry.
Step-by-Step Instructions
- Cut the Wood: Measure and cut your wood to size. You’ll need a base, three sides (left, right, back), and a top.
- Assemble the Frame: Attach the sides to the base with screws or nails. Add the top to enclose it.
- Create an Entrance: Leave the front side open and attach an additional piece of wood to keep bedding in the box. Or make custom openings for the chickens.
- Add Dividers: If you’re making multiple boxes, pop in dividers to keep each hen’s space separate.
- Paint or Seal: Give everything a coat of non-toxic paint or sealant to protect against moisture and make cleaning easier.
- Install in the Coop: Mount the boxes off the ground. This keeps them cleaner and makes them more appealing to your hens.
- Add Bedding: Line each box with soft, cozy bedding to cushion the eggs and make your hens feel at home.
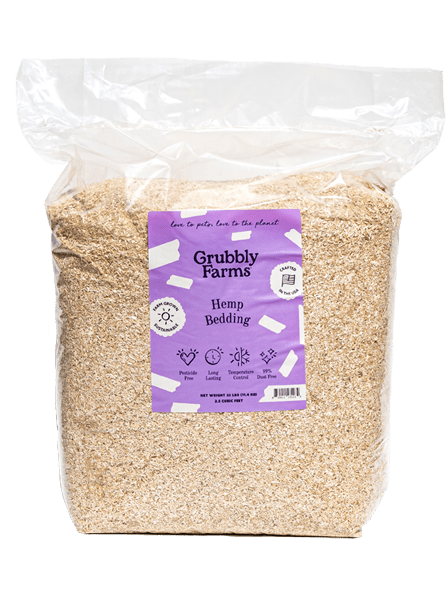
Pro Tip: Want to level up your nesting boxes? Try Grubbly Farms Hemp Bedding! It’s 99% dust-free, creating a well-ventilated and healthier environment for your hens. Plus, it’s super long-lasting, so you’ll save time and money by refreshing the boxes less often.
Nest Box Placement
Nesting boxes need to be lower than your roosts. Chickens naturally want to sleep in the highest spot, and they should sleep on roosts, not in nesting boxes. If they sleep in the nesting boxes, those boxes will quickly get filled with poop (chickens poop the most at night). Make sure all roosts are positioned higher than your nesting boxes.
Be mindful of placement—don’t put your nesting boxes directly under your roosts, as they’ll get pooped on. Ideally, position the boxes on the opposite side of the coop in a lower spot that’s still easy for you to access when collecting eggs.
Bonus Tips For Success
- How Many Boxes? One box per 3-4 hens is usually perfect. Typically, they will all use just one or two boxes but they do need options for peak laying season.
- Outside Access: Being able to access nesting boxes from outside the coop is a game changer. It makes collecting eggs a breeze!
- Keep It Clean: Change out the bedding regularly to avoid moisture or mold build up.
- Test and Adjust: Watch how your hens use the boxes and tweak things if needed.
Get Creative!
Who says nesting boxes have to be boring? Paint them in fun colors, add cute signs, put up mini curtains, or repurpose old furniture like drawers or crates. A little creativity goes a long way in making your coop both functional and fun.
Building nesting boxes is honestly easier than it sounds, and your hens will totally appreciate it. Plus, there’s nothing better than collecting fresh eggs from a setup you built yourself. So go ahead, give it a try, and don’t forget to share your creations with us here at Grubbly Farms by tagging us on social media @grubblyfarms and using #GrubblyFarms. We can’t wait to see what you come up with!
Chicken Chaser Bri’s Secret Tip: For hens that are new to laying, they may be unfamiliar or reluctant to use their nest boxes. Try placing a ping pong or golf ball in the nest and keeping the chickens in the coop for the first few hours of the morning. Chickens like to lay where another egg has already been laid, and they’ll mistake the ball for an egg!
Thank you so much for reading! I’m Bri, just a city girl who decided to get a few backyard chickens in 2021, and, well, the chicken math hasn’t stopped mathing since! I am now up to 17 chickens and 2.5 acres of farmland. You can follow my adventures, tips, and plenty of laughs on Instagram: @chickenchaserbri. Happy clucking! 🐔